Deploy Trinity on DigitalOcean
About ten minutes, most of it waiting. You run one command on your own computer and end up with Trinity on its own server, behind HTTPS, ready to sign in to.
What you need
A DigitalOcean account.
A Claude subscription (Pro or Max). Trinity's agents sign in to Claude with it.
Claude Code installed. On Windows, run everything below inside WSL.
About $48/month for the server (4 vCPU, 8 GB), billed by DigitalOcean until you delete it.
Optional: SSH keys on your DigitalOcean account. The installer attaches every key already there, so you can
ssh root@<droplet-ip>later. Without one, use the Droplet's browser Console for shell access.
Install
Install DigitalOcean's command-line tool
On macOS:
$ brew install doctlOn Linux or WSL, follow DigitalOcean's install guide.
Give it access to your account
Open API Tokens in DigitalOcean, click Generate New Token, name it, tick Write, and copy the token. It is shown only once. Then run this and paste the token when asked:
$ doctl auth initConfirm it worked:
$ doctl account getExpected: a row with your account's email and status active.
Get your Claude subscription token
Run this and copy the sk-ant-oat01-... value it prints:
$ claude setup-tokenThis is not an Anthropic API key. API keys start sk-ant-api03-, and the installer refuses them. If you want to use an API key instead, add it after the install under Settings → Integrations.
Decide on a password
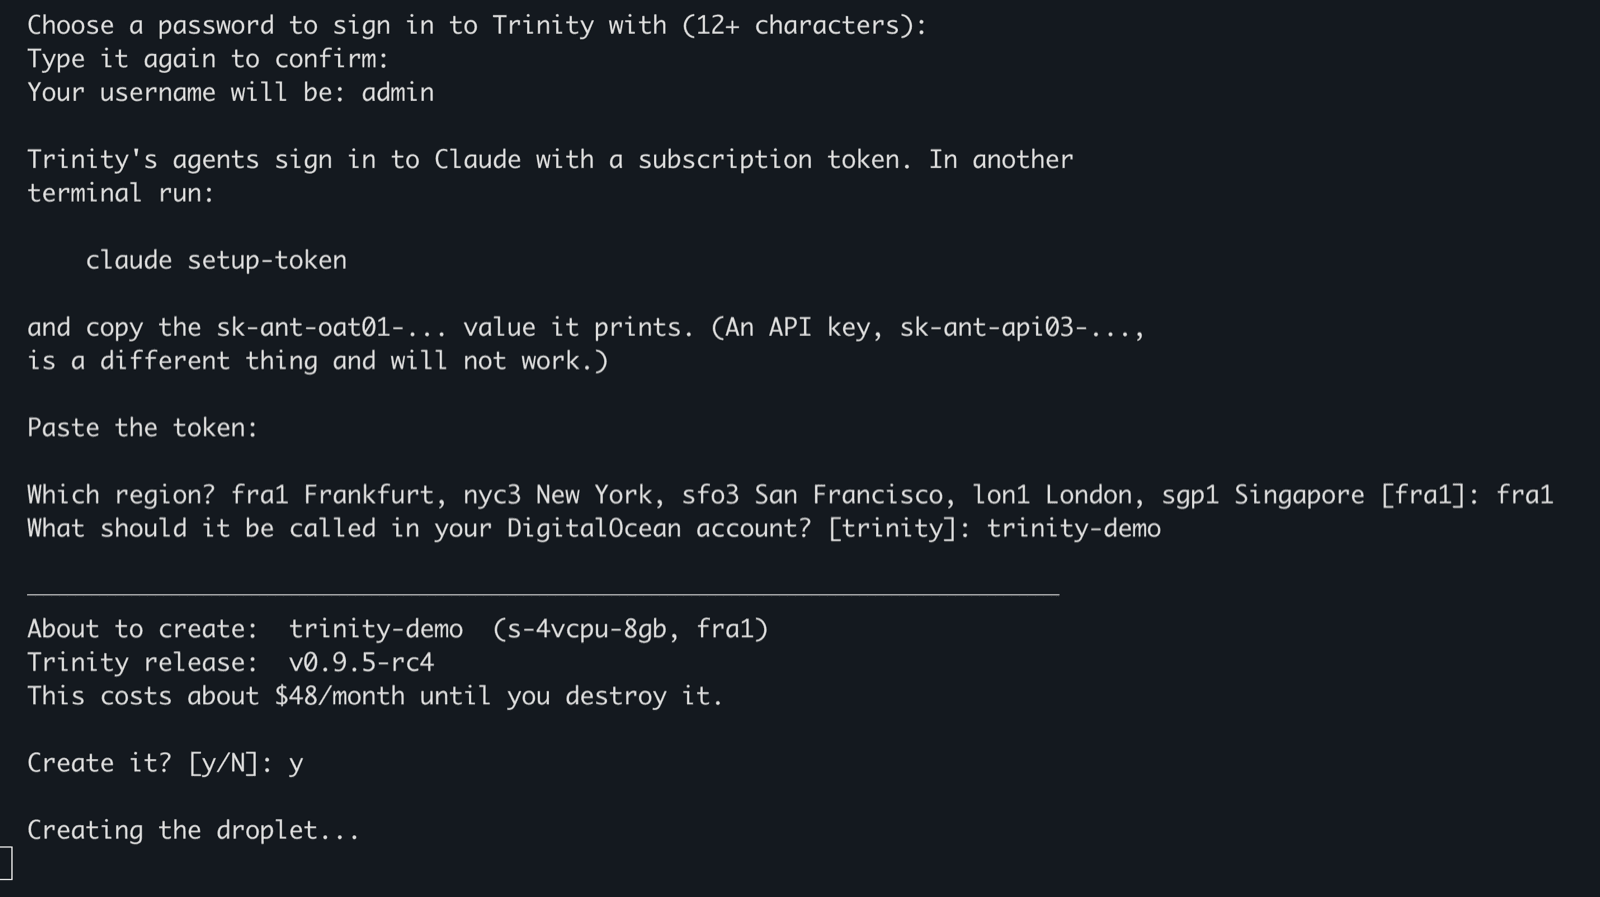
This is what you will sign in to Trinity with. It needs at least 12 characters and must not start with password, admin, trinity, changeme or letmein; the installer rejects those. Mixing upper- and lowercase letters, a digit and a symbol is what Trinity's own password rules ask for. Your username will be admin.
Run the installer
$ bash <(curl -fsSL https://raw.githubusercontent.com/abilityai/trinity/v0.9.5/scripts/deploy/trinity-do-create.sh)The script installs the release it was fetched from. To install a different one, fetch it from that release's tag; releases are listed on the releases page.
It asks for the password from step 4, the token from step 3, a region (fra1 is the default; nyc3, sfo3, lon1 and sgp1 are also suggested) and a name for the server (trinity by default). Neither secret is shown as you type or paste it. It shows you the cost and asks before creating anything. Then it creates the server, prints a dot every 15 seconds while it installs Trinity, and waits until the site answers, which takes about six minutes. It finishes with the address, the username admin, and a reminder that the password is the one you chose.
Open the address it prints
Sign in as adminwith your password. You are on HTTPS with a real certificate, and the server's internal ports are closed to the internet.
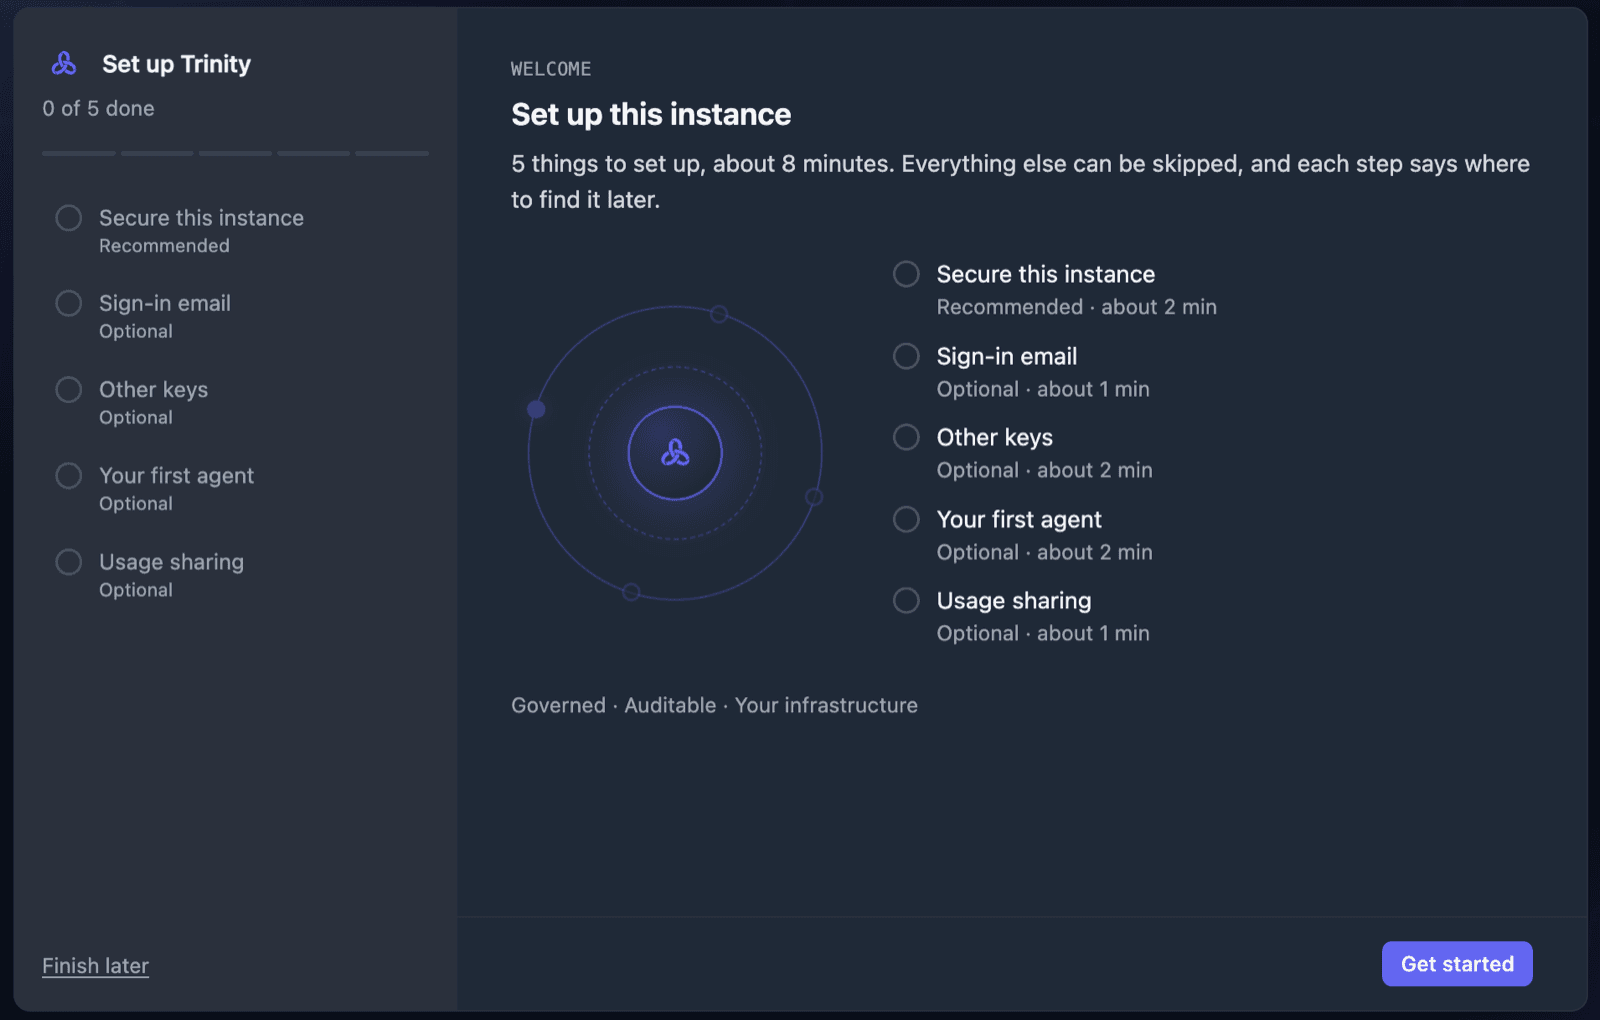
Trinity opens its first-run setup. Secure this instance is recommended (step 7 below); the rest — Sign-in email, Other keys, Your first agent and Usage sharing — is optional, and Finish later closes the sequence. There is no Connect Claude step, because the installer already connected your subscription. See First-Time Setup.
Put a domain in front of itOptional
The Secure this instance step suggests this. An IP address works, but it is awkward to share. Its certificate also lasts only about six days before it is renewed. Renewal happens automatically while the server runs; a Droplet switched off for longer comes back to a browser warning until renewal catches up.
- 1.Point your domain's A record at the server's IP address. If the domain is on Cloudflare, set the record to DNS only (grey cloud). Confirm it resolves with
dig +short your-domain.com. - 2.In the Secure this instance step, enter
https://your-domain.comin Public URL and click Save domain. Later, the same field is under Settings → General → Public URL. Includehttps://. Saving immediately re-points any Telegram and WhatsApp webhooks to the new address, which is why DNS comes first. - 3.Open
https://your-domain.comin a new tab. The first load takes a few seconds while the certificate is obtained. After that it loads normally.
Until that first visit, Trinity cannot tell whether the name works. The step's badge reads Domain saved, and Settings reads saved, waiting for the first visit to confirm it resolves here. After the visit, the badge reads Domain reached, and Settings shows the address with a tick.
The Droplet still answers anyone who finds its address. To take it off the public internet, serve the domain through a Cloudflare Tunnel, reach it over a private network, or both — a tunnel alone keeps the web UI answering anyone with the address. Hardening a Marketplace Install walks through all three choices, and Public Access covers the Cloudflare side.
Verify
The first three checks run in your browser. The rest run on the Droplet: open a shell with ssh root@<droplet-ip>, or use the Droplet's Console in the DigitalOcean control panel.
| Check | How | Expected |
|---|---|---|
| The site serves Trinity | Open https://<droplet-ip> | The sign-in page, valid padlock, no warning |
| You can sign in | admin and your password | The Dashboard with the starter fleet, and first-run setup open over it |
| Claude is connected | Settings → Integrations → Claude Subscriptions | A subscription named claude-subscription |
| The install finished | tail -20 /var/log/trinity-install.log | Claude subscription attached to agent: <name> lines, then === Trinity is ready at https://<droplet-ip> === |
| The certificate was issued | cat /etc/trinity/tls-status | ok |
| The platform is healthy | curl -s http://localhost:8000/health | {"status":"healthy",...} |
If the installer stops
It checks for doctl before asking anything, and checks each answer as you give it. The messages mean:
doctl from a package instead of snap.sk-ant-api03- key. Run claude setup-token and paste the sk-ant-oat01- value instead.sk-ant-oat01-.y at the cost prompt. Nothing was billed; run the installer again.https://<droplet-ip> after a few minutes.tail -50 /var/log/trinity-install.log.If the install log shows TLS: no valid certificate, Caddy could not obtain the certificate for the IP address. Trinity still starts, but the installer keeps waiting for HTTPS. Read journalctl -u caddy -n 100 on the Droplet, and check that no cloud firewall blocks ports 80 and 443. A Droplet that never came up has nothing to keep: delete it (below) and run the installer again.
Removing it
$ doctl compute droplet delete <name>Use the name you gave the server in step 5 (trinity if you kept the default); doctl asks you to confirm. The server costs about $48/month until you delete it. Deleting it also deletes everything on it, including your agents and Trinity's own backups, which live on the same disk — take a Droplet snapshot first if you want to keep anything. See Backup and Restore.
What the installer does
- •Creates an Ubuntu 24.04 Droplet of size
s-4vcpu-8gbin the region you chose, and attaches every SSH key already on your DigitalOcean account so you canssh root@<ip>later. - •Hands the Droplet a first-boot script that clones Trinity
v0.9.5to/opt/trinityand runsstart.sh --provision --cloud digitalocean --hosted --unattended. That installs Docker, Caddy with a Let's Encrypt certificate for the IP, and the firewall, then Trinity itself. It is the same path the Marketplace 1-Click uses. - •Writes
/opt/trinity/.env: your password asADMIN_PASSWORD, so the admin account exists at first boot, plusFRONTEND_PORT=8081(Caddy owns 80 and 443 and forwards to the web UI),FRONTEND_URL=https://<droplet-ip>,TRINITY_IMAGE_TAG=<release-tag>andTRINITY_INSTALL_SOURCE=do-script— the marker that makes the Secure this instance step appear. - •Registers your Claude subscription as
claude-subscriptionand assigns it to every agent the install created. Agents you create later pick it up automatically. - •Keeps both secrets off your screen and out of your shell history. They travel only in the Droplet's own setup data (user-data), and Trinity's container firewall stops agents from reading that back; the temporary file that carries them is readable only by you and deleted when the installer exits.
- •Waits for
https://<ip>/to answer with a valid certificate, for up to 15 minutes. The Droplet keeps its install log at/var/log/trinity-install.log.
To install a different release, fetch the script from that release's tag, or set TRINITY_IMAGE_TAG when you run it. The value must be a published release tag, because the Droplet uses it both to check out the code and to pull the images. Unlike the 1-Click image, a Droplet created this way has no Trinity login banner.
Managing the Droplet
Status, logs, restarts, password changes, upgrades and backups work as they do on the 1-Click — see Single Server → Managing the Droplet. The everyday commands run from /opt/trinity:
cd /opt/trinity
docker compose -f docker-compose.hosted.yml ps     # status
./scripts/deploy/stop.sh                           # stop (never `down`)
./scripts/deploy/start.sh --hosted                 # start, and apply .env changes
To upgrade, pin the new release in .env, check out the matching tag, and re-run start.sh --hosted. See Upgrading.
To operate the Droplet from Claude Code, point the Ops Agent at it with these values in the ops agent's .env:
SSH_HOST=<droplet-ip>
SSH_USER=root
TRINITY_PATH=/opt/trinity
COMPOSE_FILE=docker-compose.hosted.yml
FRONTEND_PORT=8081