First-Time Setup
Install Trinity, log in as the admin, and meet the starter fleet a fresh install comes with.
I Built a DevOps Agent That Deploys Other Agents
Apr 2026
Key Concepts
Admin Account — The primary account with full platform access. It is created from ADMIN_PASSWORD in .env when the backend first starts; the installer (start.sh) requires that value, so on a normal install the account exists before you open the browser. .env stays the source of truth: every backend start re-applies ADMIN_PASSWORD, so to change the admin password edit that line and restart the backend (there is no change-password form in the UI). The one exception is a DigitalOcean Marketplace 1-Click droplet created without a password: it boots with no admin account, and the first person to open it in a browser creates one. The admin signs in with the username admin (or ADMIN_USERNAME) or a registered email address, plus the password.
First-run form — A one-page “Create your admin account” screen at /setup that appears only on an install with no admin account — a Marketplace 1-Click droplet claimed in the browser, a blank ADMIN_PASSWORD brought up without the installer, or a hand-rolled backend. It refuses to run once a usable admin exists, whatever the setup flag says.
Email Login— A passwordless authentication method where users receive a one-time code via email. Requires an email service to be configured.
Starter fleet— The agents a fresh install seeds for you: the Cornelius second-brain agent plus a three-agent starter team. Nothing to configure; deleting them does not bring them back.
How It Works
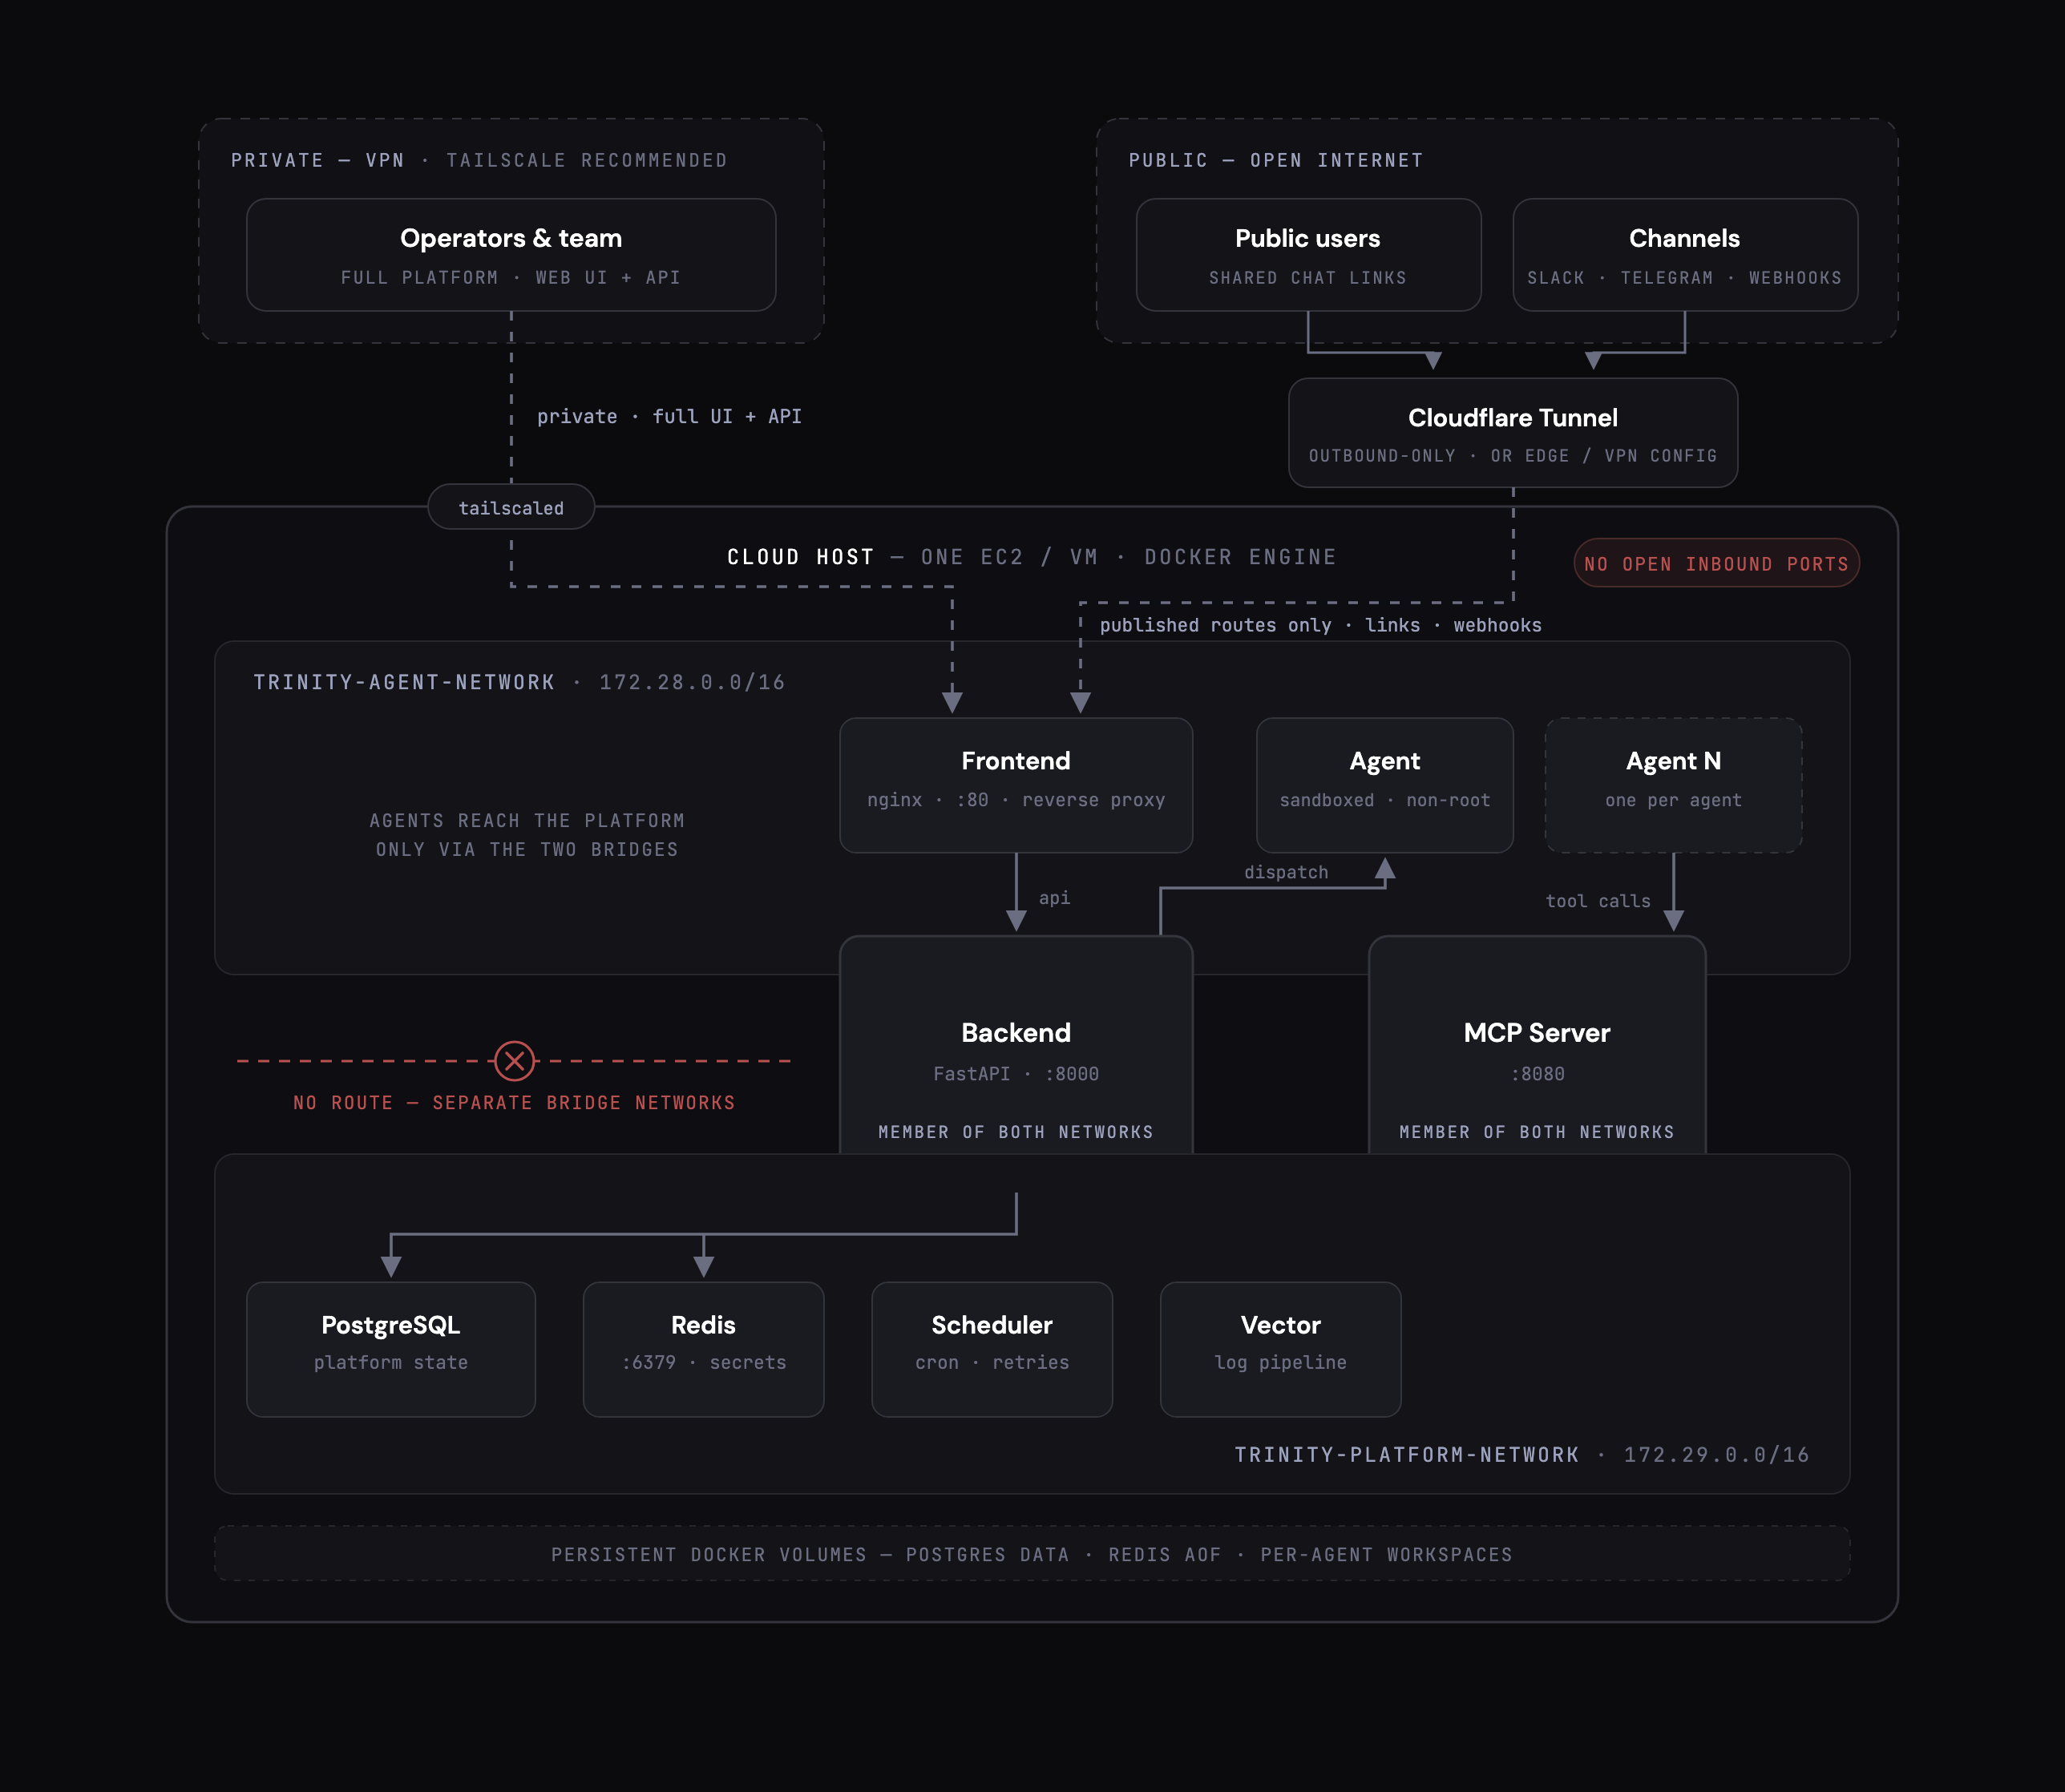
The recommended production shape: everything on one host as Docker containers, private access over your VPN (Tailscale recommended), public endpoints published only through an outbound tunnel, and agents on a separate network from the data plane. A local install is the same containers with ports exposed directly.
Prerequisites
Installation
Clone the repository
git clone https://github.com/abilityai/trinity.git
cd trinitySet the admin password
cp .env.example .env
# Set ADMIN_PASSWORD to a strong password (12+ characters)
start.sh refuses to start while ADMIN_PASSWORD is blank. It generates every other secret (SECRET_KEY, INTERNAL_API_SECRET, CREDENTIAL_ENCRYPTION_KEY, AGENT_AUTH_SECRET, the Redis passwords) and detects DOCKER_GID on first run, writing them back to .env.
Start all services
./scripts/deploy/start.shOn first run this builds the base agent image if it is missing (5–10 minutes), starts the backend, frontend, MCP server, Redis, scheduler, Vector and OTel collector, waits for the backend to report healthy, and prints the access URLs with a next-steps card. ./quickstart.sh is an alias for the same script.
No-prompt install: run ./scripts/deploy/start.sh --unattended (or set TRINITY_UNATTENDED=1) and the script never stops to ask for input — it generates the admin password and prints it in the final summary. Save it: it lands in .env and is shown only once. (A Marketplace 1-Click droplet is the exception: it never generates a password; its login banner prints the URL to claim the instance instead — see the first-run form below.) An AI coding agent (Claude Code) can drive the entire local install for you via the runbook at docs/AGENT_INSTALL_GUIDE.md. Server installs, prebuilt images and the DigitalOcean 1-Click: Deploying Trinity.
Open in your browser and log in
Navigate to http://localhost and log in.
The first-run form (installs with no admin only)
If the backend started with a blank ADMIN_PASSWORD, every page redirects to a one-page “Create your admin account” form at /setup until an admin exists. Two installs land here:
A DigitalOcean Marketplace 1-Click droplet created without a password. This is by design: the 1-Click create page has no input form, so the image boots with ADMIN_PASSWORD blank and ADMIN_PASSWORD_SOURCE=browser, and the droplet's login banner prints the URL to claim it — never a password. A droplet you gave a password at create time (cloud-init user-data, or the trinity-do-create.sh installer) has its admin provisioned at boot and never shows the form.
A bare docker compose up -d or a hand-rolled backend brought up with the password blank. The installer does not allow this on a normal install. A hosted compose started by hand with a blank password and no ADMIN_PASSWORD_SOURCE=browser marker is refused: set ADMIN_PASSWORD in .env and restart, or run ./scripts/deploy/start.sh --hosted.
On the form, enter your admin email (required — it becomes your sign-in identity), a password (12+ characters with uppercase, lowercase, number, and special character; a live checklist guides you), confirm it, and optionally your company name and an opt-in to security and product update emails. Submitting signs you straight in and opens the Dashboard. The form disables itself permanently after the account is created, and the backend refuses it outright whenever a usable admin already exists — so an install that booted with ADMIN_PASSWORD set is never in this window.
On a claimed droplet, .env keeps ADMIN_PASSWORD blank on purpose — the password lives only in the database, and reboots and start.sh --hosted updates leave it alone. Forgot it? Set ADMIN_PASSWORD in .env and recreate the backend container (./scripts/deploy/start.sh --hosted, or docker compose up -d backend); docker compose restart does not re-read .env. The backend adopts the value on that boot.
Security note: on an install with no admin, the form is reachable without authentication until you use it — anyone who can reach the URL can claim the instance. Keep such an instance behind a tunnel, VPN, or firewall until the admin account exists. On a 1-Click droplet, open its URL right after creating it (first boot takes about ninety seconds) or restrict port 443 to your own IP until you have claimed it; if a droplet you have never opened shows the login page instead of the form, someone else got there first — destroy it and create another. Setting ADMIN_PASSWORD before first boot closes the window entirely.
Logging In
Admin login — Enter username admin or the admin's registered email, plus the password.
Email login (passwordless) — Enter your email address, receive a 6-digit verification code, and submit it to log in. This requires email service configuration. The admin manages allowed email addresses under Settings → Access → Email Whitelist.
Password login is rate-limited: five failed attempts on one account within 15 minutes lock that account out until the window passes (a looser per-address limit — 30 failures in 5 minutes — guards shared networks without locking out everyone behind one address).
Your First Dashboard
On a fresh install the Dashboard opens first-run setup: one sequence over a dashboard that does not move underneath it. A rail on the left lists the steps this install actually needs — steps that do not apply to you never appear — and marks each one done as you go. The order is fixed, and you can go back:
Secure this instance — Only on an install provisioned onto a cloud VM at a bare IP (the DigitalOcean 1-Click, or the trinity-do-create.sh installer), for admins, until a domain is configured. Point a domain at the server, enter it as the Public URL and click Save domain, then optionally serve it through a Cloudflare Tunnel. Saving completes the step. Its badge reads Domain saved until the first visit to that name reaches the server, then Domain reached. “Why this matters” explains both stages and links the full hardening guide. See Single Server → DigitalOcean 1-Click.
Sign-in email — Only when the admin account has no email yet, so you can log in with email + password. An install you claimed in the browser collected it at /setup, so this step does not appear. Also at Settings → General → Admin sign-in email.
Connect Claude— The one required step. Paste a Claude subscription token or an Anthropic API key; it is checked with Anthropic before it is saved, and the first credential is handed to the agents that had none. Until this is done, no agent can run.
Other keys — Optional: a GitHub token, an email-provider key (needed for email sign-in codes), and a Gemini key (voice features and generated agent avatars). Each says what skipping it costs, and all of them live at Settings → Integrations afterwards. See Platform Keys.
Your first agent — Two doors: Show me (Watch Cornelius work) opens a seeded agent's chat so you can see one at work, and Make me one creates one from a purpose you pick — the details are in Quick Start → Guided Onboarding. Already running a fleet? A link takes you to migrating an existing one. Whichever door you take, Doneat the end of the sequence opens that agent's chat. The step counts as done once you own an agent Trinity did not seed.
Usage sharing — The anonymous usage-sharing consent, asked once inside the sequence rather than as a dialog afterwards (see Telemetry).
Every step except Connect Claude is skippable, and skipping tells you where to find it later. Finish later closes the whole sequence; nothing re-opens it on its own. To pick it up again, use Settings → General → First-run setup → Re-run setup, or add ?onboarding=1to the Dashboard URL — completed steps stay complete.
After setup, a Getting started checklist can keep you going. It ticks off your first milestones over your first days and hides itself when the last one is done. It appears only on instances with the matching enterprise entitlement.
Where it is — In the Dashboard's left Systems sidebar, under the list of views and above New View. It is not in the Dashboard body, so it never pushes the fleet down. The sidebar opens expanded unless you collapsed it earlier in this browser. Collapsing it hides the checklist along with the view labels.
How it works — Its header shows your progress (for example 1/4) and collapses or expands the list. Your browser remembers that choice. Only the next unfinished item has an action button. The list refreshes whenever you return to the Dashboard, so a milestone you reach on another page shows up without a reload.
Retiring it — Don't show this againhides the checklist for good. Nothing brings it back, so collapse the header instead if you only mean “not now”.
Your Starter Fleet
On a fresh install, Trinity seeds agents so you land on something working without cloning or configuring a template:
Cornelius — a ready-to-use second-brain agent, cloned from its public template at first boot, with the Brain Orb enabled — a self-rendering 3D knowledge graph on its Brain tab (see Dynamic Dashboards → the Brain Orb).
The acme starter team — three collaborating agents from the bundled default system manifest: acme-scout (research), acme-sage (strategy) and acme-scribe (content), sharing folders and able to call each other. They ship with no schedules and need no credentials at seed time. Skip or replace this fleet with TRINITY_DEFAULT_SYSTEM_MANIFEST — see System Manifests → Default System on First Run.
Seeding runs once, only on a truly fresh install: it is skipped when the instance already has agents, and deleting a seeded agent does not re-create it. Installs without Docker (demo mode) skip it entirely. The seeded agents cannot think until you add a model credential — the Connect Claude step of first-run setup, or an Anthropic API key or a Claude subscription under Settings → Integrations; the first credential you add is connected to every agent that has never run successfully. The three acme agents ship with a bundled default avatar; Cornelius shows initials until a Gemini key exists and Generate Default Avatars(Settings → General) has run.
Security & product updates (optional)
Settings → General → Security & product updates lets the admin opt in to occasional security and product-update emails from the Trinity team: Email (required), Company, Name, Role and Primary use case (optional), an Exactly what would be sent preview, and Opt in & submit. It sends exactly that, at most once per install, and nothing leaves the box unless you submit. An install claimed in the browser asked the same question on the /setup form; ticking it there is the same once-per-install submission. Air-gapped or privacy-strict installs disable it entirely with OPERATOR_INTAKE_ENABLED=false or DO_NOT_TRACK=1. The separate, anonymous Usage sharing consent is described in Telemetry.
Key URLs
| Service | URL |
|---|---|
| Web UI | http://localhost |
| Backend API docs | http://localhost:8000/docs |
| MCP Server | http://localhost:8080/mcp (on a server install also https://trinity.your-domain.com/mcp) |
Stopping and Starting
# Stop all services (containers and the agent network stay in place)
./scripts/deploy/stop.sh

# Start all services
./scripts/deploy/start.sh

# Rebuild services after code changes
docker compose build --no-cache backend frontend mcp-server scheduler

# View backend logs
docker compose logs -f backend
Never docker compose down an instance you want to keep — see Deploying Trinity → Managing Services.
Settings
Settings is tabbed — General, Access, Integrations, MCP Keys, Agents, Retention, plus tabs that appear only when the corresponding capability is enabled. The tab-by-tab guide is in Using Trinity → Settings. The GitHub personal access token that lets agents pull and push repositories is covered in GitHub PAT Setup.
For Agents: Authentication API
Authenticate programmatically using the token endpoint:
POST /api/token
Content-Type: application/x-www-form-urlencoded

username=admin&password=YOUR_PASSWORD
Returns:
{
  "access_token": "eyJ...",
  "token_type": "bearer"
}
Include the JWT access_token in the Authorization header for all authenticated requests:
curl -H "Authorization: Bearer YOUR_ACCESS_TOKEN" \
  http://localhost:8000/api/agents
Token Details
JWT tokens are valid for 7 days
Tokens are invalidated when the backend restarts. Re-login is required.
MCP API keys (prefixed trinity_mcp_) also work as Bearer tokens
Unauthenticated Endpoints
The following endpoints do not require authentication:
First-run state
Limitations
Backend restarts invalidate all active JWT tokens. All users and integrations must re-authenticate.
Email login requires a configured email service. Without it, only admin password login is available.
Trinity requires Docker. It cannot run without it.
Seeding Cornelius needs outbound access to GitHub at first boot; a failed pass is retried on the next start.